
DIY how to build your shed easy and cheap
Valuable tips given to build your own shed with right plans and materials will be pocket friendly, free up your space and enhance your garden landscape.
Click the links below to download the construction drawings and material list for the 2009 shed. And read on for how to build a shed.
2009 Shed Plans Construction Drawings
Save up to $3,000 on this shed 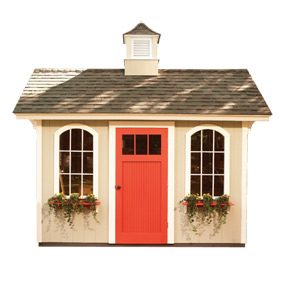 Money saving options
This shed is designed to be budget friendly.
We designed this shed with money saving in mind. Even the dimensions are designed to make the most efficient use of lumber. Here are some of the ways you’ll save with our wood shed plans.
OSB siding Siding panels made from oriented strand board cost far less than solid wood or plywood panels, and come preprimed, saving you money and labor. Since the panels are also structural, you don’t need an additional layer of sheathing under the siding. You’ll save about $500 over the cost of cedar plywood siding.
Wood foundation Hiring a concrete contractor to pour a slab for this shed could cost you $1,000, but the materials for this wood foundation will set you back only about $250. Plus, a wood foundation is easy to build even on sites that slope or have difficult access.
Cost-cutting custom door Materials for this door cost about $140. A similar style prehung exterior door can easily cost more than $1,000. Of course, this door isn’t as weather-tight as a prehung door, and it wouldn’t work on your house, but it’s perfect for a shed. You get the look of an expensive custom wood door without the cost.
Easy arch-top windows If you’ve ever priced arch-top windows, you know how expensive they can be. Even windows that don’t operate are likely to cost $400 apiece. But you can simulate the look of an expensive window without spending a ton of money. These windows cost about $60 each and are easy to build with materials you’ll find at any home center or lumberyard.
Composite trim Composite trim saves you money and time right away. It’s less expensive than solid wood (you’ll save up to $160), it doesn’t have knots or other defects to work around, and it comes preprimed and ready for paint. And it’ll save you time and money in the long run since it holds paint better and longer than even the best-quality exterior wood.
Keep reading to learn how to build a shed.
Click here to watch the video for more wood working ideas
Getting started: How to build a shed
Arch-top windows and a custom door give this shed a high-quality look that belies its low cost and simple construction. The panelized construction technique means you could build the parts in your garage on a rainy weekend and then haul them to the site for assembly. Modest finishes like OSB siding and composite trim and fiberglass shingles help keep the materials cost low. And you’ll save hundreds of dollars by providing your own labor to build the door and windows. The modular construction and wood platform foundation mean you can construct this shed almost anywhere, even on remote or sloping sites. In this article, we’ll show you the basics of how to build the shed and install the windows and doors.
We found all the materials to build this shed at our local home center. Most of the construction is straightforward and requires only standard carpentry tools and a circular saw. For how to build the shed windows and door, you’ll also need a table saw, power miter saw and router. We used a Kreg pocket hole jig and pocket hole screws to assemble the door and windows. With a helper or two, you could have the platform and shell built in two or three days. Then expect to spend four or five more days completing the siding, trim, doors, windows and roofing.
A few weeks before you start, check with your local building department to see whether a permit is required and to find out how close to the lot lines you can build. Then call 811 for instructions on how to locate buried utility lines. The first step is to set a pair of treated 6x6s on gravel beds as a foundation for the shed platform.
When you’ve decided on a shed location, dig two trenches 16 in. wide, 12 in. deep and 13 ft. long. Center the trenches 66 in. apart. Fill the trenches with a 3-in. layer of gravel and compact it with a hand tamper. Repeat this process until the trench is full. Use a level and long board to level the top layer of gravel. If the ground is flat, also make sure the gravel beds in the two trenches are level with each other.
Cut the treated 6x6s to 12 ft. and set them on the gravel so they’re parallel and the outside edges are 6 ft. apart. On sloped ground, you’ll have to raise the 6×6 on the low side until it’s level with the adjacent 6×6. Do this by stacking treated 2x6s, 4x6s or 6x6s on top of the treated 6×6 to reach the right height. Use a 4-ft. or longer level to make sure the 6x6s are level and level with each other. Finally, square the 6x6s by adjusting the position of one 6×6. Slide the 6×6 back and forth, not sideways, until the diagonal measurements from opposite corners are equal. Build the platform with treated 2x6s, 24 in. on center, and cover it with treated 3/4-in. plywood (Figure B).
Figures A: Shed and B: Floor Framing Plan
These illustrations show how how to build a shed and how the platform is constructed. For larger images that you can print, see Additional Information at the end of this article.
Note: Figures A and B (along with Figures C through G) can be downloaded and printed from Additional Information below.

Build the walls 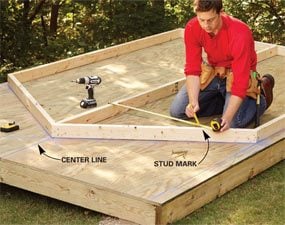 Photo 1: Assemble the end walls
Build the end walls on the platform, using chalk lines as a guide. Start by nailing together the perimeter and adding the center stud. Then measure from the center stud to mark for the remaining studs. 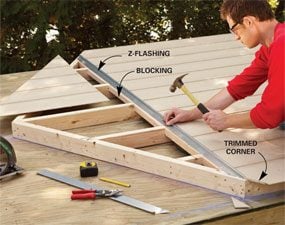
Photo 2: Attach flashing over the siding seam
Nail siding to the walls before you stand them up. Cover the horizontal seam with metal Z-flashing to keep out water. 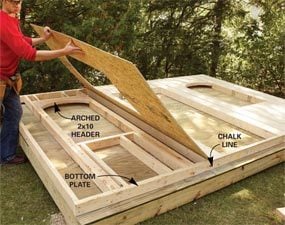
Photo 3: Side the walls
Screw the front wall to the platform to hold it square while you add the siding. Align the bottom plate with a chalk line to make sure it’s straight.
You can build the walls on any flat surface, but the shed platform is ideal. Snap chalk lines on the plywood deck, 3-1/2 in. from the edges of the platform, to indicate the inside edge of the walls. Measure to make sure the lines are parallel and 89 in. apart. Then chalk a line down the center (Photo 1). You’ll use this line to make sure the angled top plates meet in the center.
Use dimensions from Figure C (in Additional Information below) to snap lines for the peak. Then cut 2x4s to fit inside the lines and toe-screw them to the plywood to hold them in place while you fill in the center studs (Photo 1) and nail on the siding (Photo 2). Toe-screw from the outside so the screws will be accessible after the siding is installed.
When you nail on the siding, make sure it overhangs the framing on each side by 3-1/2 in. and that you’ve trimmed off the top corner to follow the slope of the angled top plate (Photo 2). Attach the siding with 2-in. galvanized or stainless steel ring-shank siding nails placed 8 in. apart along studs and 6 in. apart along the edges of the sheets. You’ll have to nail blocking between the studs to support the top edge of the siding and the Z-flashing.
Complete the siding, then remove the toe-screws and move the wall aside to make room for constructing the opposite wall. Use the same chalk line template and process to build the opposite end wall. Figure C (in Additional Information below) shows framing details for the front wall. Mark the curves on the 2×10 header pieces using the trammel setup shown in Photo 12 and Figure G (in Additional Information below). Cut them with a jigsaw. When you’re done building the front and back walls, set them aside so you can use the platform to build the roof sections.
Build the roof in two pieces 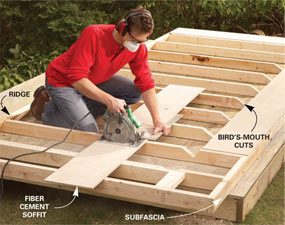 Photo 4: Install the soffits
Add the soffit to the roof frame while it’s on the platform. That will save you the hassle of upside-down nailing in a confined spot.
It’s unconventional, but building the roof upside down on the platform has advantages. First, you avoid a lot of ladder work. And second, you can nail the soffit material to the overhangs easily without having to work overhead and in cramped spaces. You do have to take a little extra care to make sure the framing is square and the perimeter 2x4s are perfectly straight before nailing on the soffit, though. Start by cutting out the rafters using the pattern in Figure D (in Additional Information below) as a guide.
Omit the bird’s-mouth from four rafters and use these on the ends. Cut the 2x4s for the ridge and subfascia to length and mark the rafter positions on them. Line up the rafters with the marks and nail through the ridge and subfascia with 16d nails to secure them. When the roof frame is complete, line up the subfascia with the chalk line on the platform and tack it in three or four places with toe screws to hold the frame straight while you install the soffit.
Also square the frame by making sure diagonal measurements from opposite corners are equal. Then tack one corner to hold it square. Finally, nail the soffit to the roof frame with 6d galvanized box nails. We used 12-in.-wide fiber cement siding for soffit material. Mount an inexpensive carbide blade on your circular saw to cut the fiber cement. Set the roof panel aside and build the other half of the roof using the same techniques.
Stand the walls 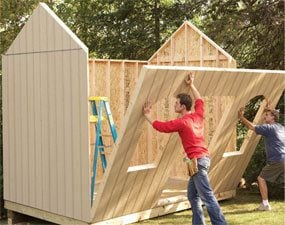 Photo 5: Nail the walls in place
Stand the walls, starting with the back wall. Then add the sides and finally the front. Nail each wall to the platform as you go and lock the corners together by nailing through the overhanging siding into studs.
Start by moving one of the end panels into place and resting the bottom plate of the wall on the platform. Tip the wall up and secure it with a temporary angled 2×4 brace. Line up the bottom plate with the chalk line and drive a few 3-in. screws or 16d nails through the plate to hold the bottom of the wall in position.
Don’t worry about getting the wall plumb yet. It’ll be automatic when you stand the back wall and connect the corners.
Stand the back wall. Then align the corner of the side and back walls and nail them together. With a helper on the outside of the shed to push if necessary, line up the inside edge of the bottom plate with the chalk line and nail it to the platform. Continue around the building, standing the opposite end wall and finally the front wall. Nail the corners together, making sure that the top plates of adjoining walls are flush with each other.
Hoist the roof panels into position 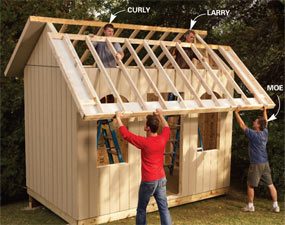 Photo 6: Lift the roof into place
Gather some helpers to help lift the roof sections into place. Don’t forget to toenail every rafter to the wall before you start the roof sheathing. 
Photo 7: Mark the gable end trim for the brackets
Mark rather than measure for the notches. It’s faster and more accurate. Start by cutting the gable end trim a little long and cutting the angle on the top. Then tack it up parallel to the end rafter and mark for the bracket notch.
The roof panels are heavy and a bit awkward, so round up three strong helpers for this part of the job. Move the panels into position and lean them against the front and back walls. Then set up ladders inside the building for two helpers and push one of the panels up to them. Slide the panel up the roof until the bird’s-mouths drop over the top plate of the wall.
Make sure the 2×4 ridge is perfectly aligned with the peak of the wall. Then secure the roof panel with a pair of toenails through each bird’s-mouth into the top plate of the wall. Repeat the process on the opposite side (Photo 6). Complete the roof framing by nailing the 2×4 ridges together and adding two 2×4 collar ties, 4 ft. apart (Figure A).
Build the door  Photo 8: Assemble the frames with pocket screws
Build two frames. Then glue and clamp them together to make a 1-1/2-in.-thick door. Use pocket screws to assemble each frame. 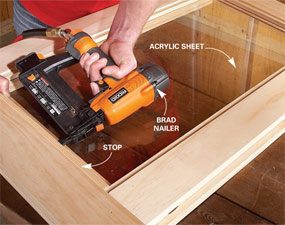
Photo 9: Install wood stops to hold the Plexiglas in place
Set the plywood and Plexiglas insert into the recessed area on the back of the door. Nail wood stops around the perimeter to hold them in place. 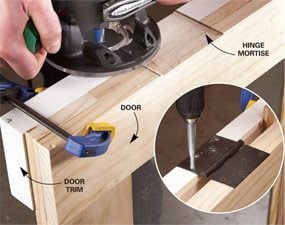
Photo 10: Route the door hinges
Eliminate measuring mistakes by clamping the door and trim together before routing for the hinges. Make sure the trim piece extends 1/8 in. above the top of the door before you clamp it. 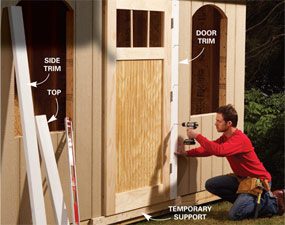
Photo 11: Attach the door trim
Center the door on the opening and screw through the trim to attach it. Support the door with a temporary 2×4 screwed to the platform. Attach the opposite side trim and finally the top.
Ordering a prehung wood door like this from the lumberyard could cost as much as $1,000, but you can build one suitable for a shed at a fraction of the cost. We purchased clear pine at a home center and spent $120 for the boards. Photos 8 – 10 show how to build the door and mount it to a trim piece with hinges. The door consists of two layers of 3/4-in.-thick boards that overlap at the corners to add strength. Rip 1×6 boards to 4-1/2 in. on a table saw for the outside layer (Figure F, Additional Information below).
We assembled each layer with pocket screws before gluing the two layers together, but if you don’t own a pocket hole setup, you could simply screw through the overlapping boards instead. Complete the door frame. Then cut the 4 x 8-ft. grooved plywood to fit the lower recess, and cut a piece of 1/4-in. acrylic sheet to fit the upper recess. Secure the plywood and acrylic sheet with 1/2-in. x 1/2-in. moldings nailed to the inside. Sand the edges of the door flush.
We’ve simplified the door-hanging process by mounting the door to a 1-1/2-in.-thick trim piece and then screwing the trim to the wall. An easy way to mark and cut matching hinge recesses in both the door and the trim is to clamp the trim alongside the door, making sure it extends 1/8 in. beyond the top of the door. Then mark the hinge cutout on both the door and the trim at the same time.
If you have a router, use a hinge-mortising bit (or straight bit) to cut the hinge recesses (Photo 10). Otherwise, use a sharp chisel. Screw the hinges to the door and trim. To hang the door, line up a temporary 2×4 with the bottom of the siding and screw it to the wall. Then rest the door on the 2×4 and drive 3-in. screws through the trim into the framing to hold the door in place (Photo 11). Finish the door installation by adding the top and side trim pieces.
Build the windows 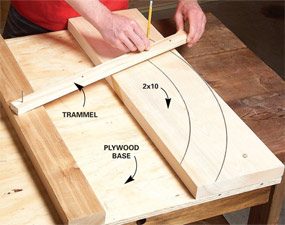 Photo 12: Mark the window arches
Mark out the arched window trim using a simple trammel. Use the same setup for marking the curved 2×10 header and the curved bracket support. 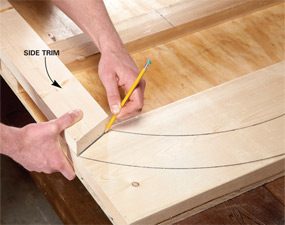
Photo 13: Mark the angled cuts on the side trim pieces
Mark and cut the side trim pieces. Then set them in place on the top piece to mark the angled cuts. 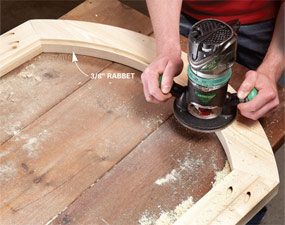
Photo 14: Rout the back of the window trim
Assemble the window frame with pocket screws, then rout a recess in the back for the acrylic sheet. 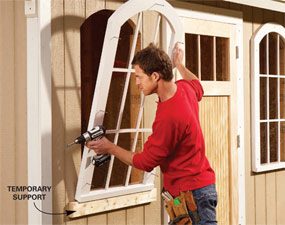
Photo 15: Install the windows
Rest the window on the temporary 2×4 and screw it to the wall. Center the window on the opening before driving the screws.
This is a good rainy day project since you’ll build these parts in your garage or shop. Photos 12 – 14 show how to cut the curved window top and how to assemble the window.
Figure G (in Additional Information below) shows details for the marking jig. Photo 12 shows how to use this setup to draw the curves for the window pieces. Next cut the side pieces (Figure F, in Additional Information below). Set the side pieces in place over the top of the header and mark the angled cuts (Photo 13). Finish the curved trim piece by first cutting the angles on each end, and then sawing the curves with a jigsaw and sanding them smooth. Use the marking jig to lay out the curved brace, too (Figure G, in Additional Information below).
Cut the sill piece and assemble the windows with pocket screws. Using a router with a 3/8-in. rabbet bit, rout a 3/8-in.-deep recess on the back of the window to receive the 1/4-in. Plexiglas acrylic sheet (Photo 14). Set the window frame, recessed side down, over a piece of acrylic sheet and trace the shape with a permanent marker. Cut the curve with a fine-tooth jigsaw blade and the straight sections with a fine-tooth blade in a table saw or circular saw.
Prime and paint the window and let it dry. Then apply a thin bead of clear silicone in the recess and embed the acrylic sheet in it. Secure the acrylic sheet with glazing points. Let it set up overnight. We cut the grid pieces from 3/4-in. x 1/2-in. parting stop and glued them to the acrylic with clear silicone caulk.
A temporary support makes it simple to install the window. Level a 2×4 and screw it to the wall 2 in. below the window opening. Then rest the window on the 2×4 and center it in the opening before driving screws to secure it (Photo 15). Use caulk to fill the gaps left by the grooved siding.
Install the exterior trim
Figure A (above) and Figure E (in Additional Information below) show how to build a shed and the exterior trim details. Start by mounting the brackets. Line up the outside edges of the lower brackets with the face of the siding, push them tight to the soffit and screw them to the wall. Center the top bracket on the peak and push it tight to the soffit. Starting with the pieces that go under the brackets, wrap the corners with the corner board. Overlap the front corner board onto the side corner board (Figure E, in Additional Information below).
Get ready for roofing by adding the fascia boards and shingle molding. Photo 7 shows how to notch the fascia boards to fit around the brackets. Keep the 1×2 shingle molding flush to the top of the roof plywood.
Roof, stain and paint the shed
Complete the shed by installing shingles and finishing the exterior. For information on how to install shingles, go to thefamilyhandyman.com and search for “roofing.”
Prime and paint the doors and windows before installing them, then you only need to caulk and fill nail holes before rolling an additional coat of paint onto the flat surfaces. The LP SmartSide panel siding, the composite fascia and corners, and the fiber cement soffit were all pre-primed and required only two coats of paint to finish.
Additional Information Figure A: Shed Plans and Figure B: Floor framing plan Shed Blueprint Details: Figures C through G Shed Materials List Required Tools for this how to build a shed Project
Have the necessary tools for this DIY how to build a shed project lined up before you start—you’ll save time and frustration. Air compressorAir hoseBrad nail gunCaulk gunChalk lineCircular sawClampsCordless drillDrill bit setHammerHearing protectionJigsawLevelPocket hole jigRouterSawhorsesSpeed squareStepladderTape measureTin snips
For more ideas from an expert,watch the video here
My gratitude to the author of this article: familyhandyman.com